What is continuous data load in Snowflake? What are the ways to achieve the continuous data load in snowflake? What are the cost and benchmarks for the solution? What are the ways to reduce the significant cost of continuous data load to snowflake? and last but not least what are the limitations of the solution?
We will discuss each of these questions in this blog.
In the last post on bulk data load(medium link), we discussed 2 things:
- How to load bulk data (micro-batches) having a high frequency, on snowflake using copy command?
- What will be the cost for the solution if the frequency is higher?
Please go through the last post here, If you are reading my article for the first time. It will help you to create an understanding of how AWS and Snowflake create handshake to share data between the 2 technologies.
What is Continuous Data Load in Snowflake?
Snowflake provides a serverless solution, where files coming on the Object Storage(like S3 in this case) will be loaded on Snowflake table without using any external resource and Snowflake will charge for compute usage while data loading.
Continuous data load can be achieved by Snowflake using these different ways:
- Snowpipe: Easiest and one of the most popular solutions as it requires the least effort and is categorized as a zero code solution.
- Kafka Connector for Snowflake: Reads data from Apache Kafka topics and loads the data into a Snowflake.
- Third-Party Data Integration Tools: Read more about these integrations on Snowflake official website about existing and new integrations.
How Does Snowpipe Work?
Snowpipe loads data from files as soon as data or files are available in the stage and runs a copy statement to load the data into the Snowflake. But how does Snowflake knows that there are new staged files available?
There are 2 ways for detecting staged files:
- Event Notification from S3 bucket. Read more about s3 event notification and cost of the process here.
- Calling Snowpipe REST endpoints.
In this blog, we will discuss around the first point, where we will utilize the event notification from cloud storage (S3 in this case) to automate the continuous data load using Snowpipe. At the end of this blog, we will also discuss which solution should be preferred for high-frequency data and which solution is cost-effective.
What are the Steps to load Continous Data using Snowpipe?
Continuous data load in Snowflake using Snowpipe is a 5 step process.
Few of the initial steps to configure the access permission are similar to the Bulk load data using Copy Command. In this blog, we will refer few of the previous post links to keep this blog precise.
Step 1: Create Storage Integration & Access Permissions
Refer to step 2 in this document for storage integration.
Step 2: Create Stage Objects
Refer to step 3 in this document for stage objects.
Step 3: Create a Pipe with Auto-Ingest Enabled
The pipe uses the COPY INTO <table> command internally to load data in an automatic fashion whenever a new notification for file ingestion gets received.
create pipe mypipe auto_ingest=true as
  copy into production_object_storage
  from @my_csv_stage
  file_format = (type = 'CSV');
The AUTO_INGEST=TRUE is important to specify to read event notifications sent from an S3 bucket to an SQS queue when new data is ready to load.
Step 4: Provide Permission to the user which will run Snowpipe
If you are an account admin or have a higher access level (because you are trying this on a newly created personal Snowflake), in that case, you can skip this step, else you can give permission to the current role and user as follows:
-- Create a role to contain the Snowpipe privileges
use role securityadmin;

create or replace role snowpipe1;

-- Grant the required privileges on the database objects
grant usage on database snowpipe_db to role snowpipe1;

grant usage on schema snowpipe_db.public to role snowpipe1;

grant insert, select on snowpipe_db.public.mytable to role snowpipe1;

grant usage on stage snowpipe_db.public.mystage to role snowpipe1;

-- Grant the OWNERSHIP privilege on the pipe object
grant ownership on pipe snowpipe_db.public.mypipe to role snowpipe1;

-- Grant the role to a user
grant role snowpipe1 to user jsmith;

-- Set the role as the default role for the user
alter user jsmith set default_role = snowpipe1;
Step 5: Configure S3 for Event Notification for Snowpipe Configuration
This is an important step. For ease of the user, Snowflake managed SQS can be used to send new events from your S3 bucket.
How Snowpipe Loads Data into Snowflake?
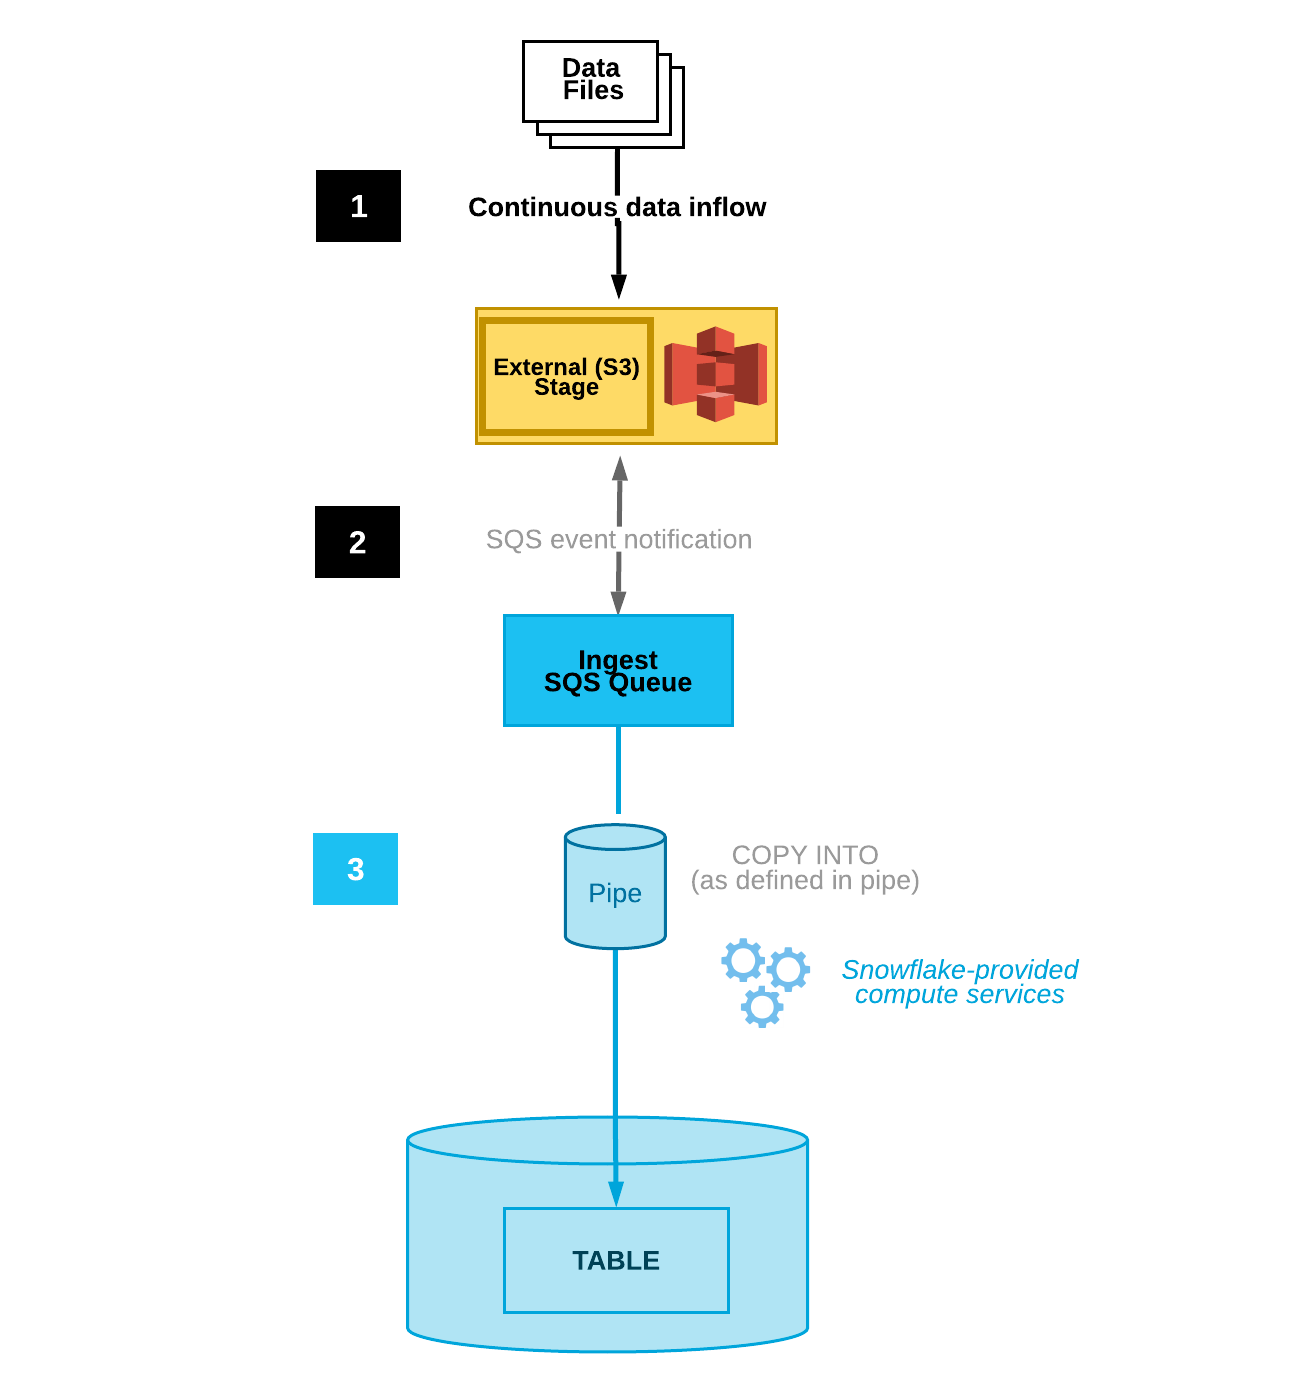
As depicted in the below diagram, as soon as new files come to the external stage(in this case, this is personal or your organization’s bucket), an event notification gets triggered and the notification gets stored in the SQS Queue(which is Snowflake managed or on Snowflake AWS cloud and outside your organization account and VPC).
A pipe(consumer) is configured at the Snowflake end which keeps on listening to the SQS queue and sends a notification to snowflake for compute provisioning and starts ingesting data into Snowflake using copy command.

Thus, what is pending now is to create an S3 event notification and configure SQS queue.
In order to get SQS ARN (managed by snowflake), run the following command on Snowflake and copy the SQS ARN from notification_channel column as shown in the picture below.
show pipes;

Now follow this sequence to add and create S3 notification
AWS S3 console >> Properties >> Event Notification >> Create Event Notification >> add path & SQS ARN >> Save/Submit
If you are still with me then we have completed all the steps and now is the time to test the continuous load by uploading files on the S3 bucket.
Step 6: Validate the Data Load using Snowpipe
Now, if you have uploaded files on S3 then you will start seeing the data on the table, If the data is still not loaded, then you probably have these questions in your mind.
- How to check if Snowpipe is successfully established?
Run the following command on Snowflake to check if the connection is successfully established. Here ‘mypipe’ is the name of the pipe created in Step 3.
select SYSTEM$PIPE_STATUS('mypipe');This command will return a JSON response, where “executionState”:”RUNNING” denotes if everything has been setup properly and as expected.
- I have uploaded the file on S3, but why the data is still not visible in the table using Snowpipe?
If you have uploaded the file on S3, but data is not yet loaded onto the table, then check the issue with the content using this command:
select * from table(validate_pipe_load(
  pipe_name=>'MYPIPE',
  start_time=>dateadd(hour, -24, current_timestamp())));
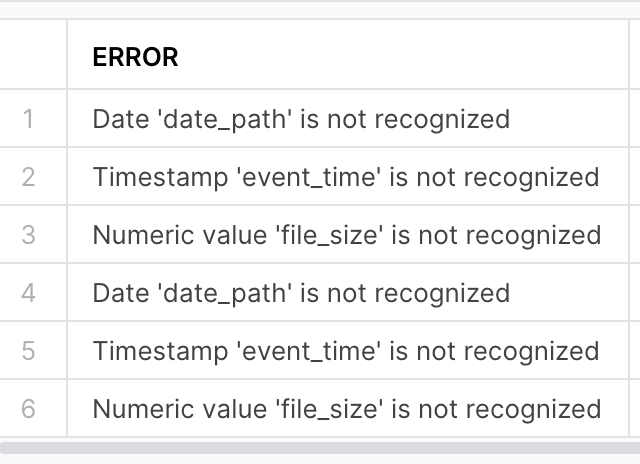
This command returns result, a sample of which is shown below, which shows if there was any problem with data or compatible schema.

- SYSTEM$PIPE_STATUS command is showing the last ingested file but why data is not visible in the target table?
There are chances that SYSTEM$PIPE_STATUS command will show lastIngestedFilePath and lastForwardedFilePath as the correct path but the file is not loaded, this happened due to reason that there is some problem with the file as mentioned in the above question.
- When using Snowpipe, why am I not able to see any entry in load_history table for success or failure?
All the data loaded or failed using Snowpipe do not create an entry in load_history instead it uses ‘pipe_usage_history’ for this purpose.
select *
  from table(information_schema.pipe_usage_history(
    date_range_start=>dateadd('hour',-24,current_timestamp()),
    pipe_name=>'mypipe'));
How Snowpipe Cost is Calculated?
- Compute resources is necessary to decompose, decrypt and transform the new data. Snowflake adds costing for compute usage.
- Apart from this an overhead cost for managing files in the internal Snowpipe queue is also included and this overhead charge increases with proportion to the number of files queued for loading and the size of files loaded(more time to load a file will increase queue time and thus cost).
In order to validate and get some approximation, I have run a few experiments as below:
Snowpipe charges approximately 0.06 USD per 1000 files queued.
With my experiment, it consumed around 0.000287202 Credits = 0.001148808 USD for 10K rows CSV file.
One important point that I noticed while doing this experiment is that there is no definite latency on Snowpipe load and sometime it takes unabruptly more time to load data and there is not much you can do during that time. I guess Snowflake should add more transparancy during the whole process.
How to reduce cost in Snowpipe?
- File size should be roughly 10–100MB(Snowflake Documentation has referred to around 100–250MB, but my recommendation is to keep the file size smaller) in size compressed.
- Try to reduce the total time to aggregate file data within 1 min. One way to try this is if your source application takes more than 1 minute to accumulate the data, then consider creating split data files once per minute.
- If there are more frequent files at the stage location and more than one file is coming within a minute, in this case Snowpipe will utilize the internal load queue to manage these files and overhead cost will increase.
- Snowflake recommends enabling S3 event filtering for Snowpipe to reduce event noise, latency, and finally cost.
- If file size in the above range is not possible, then consider removing “SKIP_FILE” as the default option for Snowpipe, as it might waste a lot of resources and credits and might cause a huge delay. The better option would be “CONTINUE” for such cases.
Things to Note:
- Only Snowflake hosted on AWS supports AWS S3 event notification for Snowpipe(by the time this blog was posted).
- When you use AWS SQS notification then data moves out of your current VPC and this traffic is not protected by your VPC.
- All data types are supported, including semi-structured data types such as JSON and Avro.
- Snowpipe does not load a file with the same name if it has been modified later, because Snowpipe maintains metadata for itself and changing the name doesn’t modify this metadata.
- Snowpipe maintains load history only for 14 days, a modified file can be loaded after 14 days as metadata will not be valid then. While bulk data load keeps this metadata for 64 days.
- Snowpipe does not guarantee that files will be loaded in the same order they were staged, though if files are not getting staged at exceptionally high velocity, then order violation will be visible or detectable. In order to handle this it is recommended to load smaller files once per minute. Load order is not maintained due to multiple processes pulling files from the queue and depending upon the time to load, the sequence of data load could appear as different.
- By default, Snowflake applies “SKIP_FILE” when there is an error in loading files, while copy command uses ABORT_STATEMENT as the default behavior.
- Snowflake caches the temporary credentials for a period that cannot exceed the 60 minutes expiration time. If you revoke access from Snowflake, users might be able to list files and load data from the cloud storage location until the cache expires.
Conclusion:
After my experiment with Snowpipe, These are my takes:
- It was not able to handle high-velocity files, where a lot of files are coming at a higher pace and of course, maintaining the order was a big issue.
- When the file size is higher(between 100MB to 200MB) then it takes an unexpectedly huge time to load, while the same file can be loaded in less time using copy command.
- Once a file is loaded on S3, there is not much visibility of the files status and queue length and it becomes tricky to check why files are not loaded and debugging becomes tricky. (If you have found any solution for this then please comment).
- Snowpipe is good for very small files with a very low frequency where the latency of file ingestion is not a determining factor.
